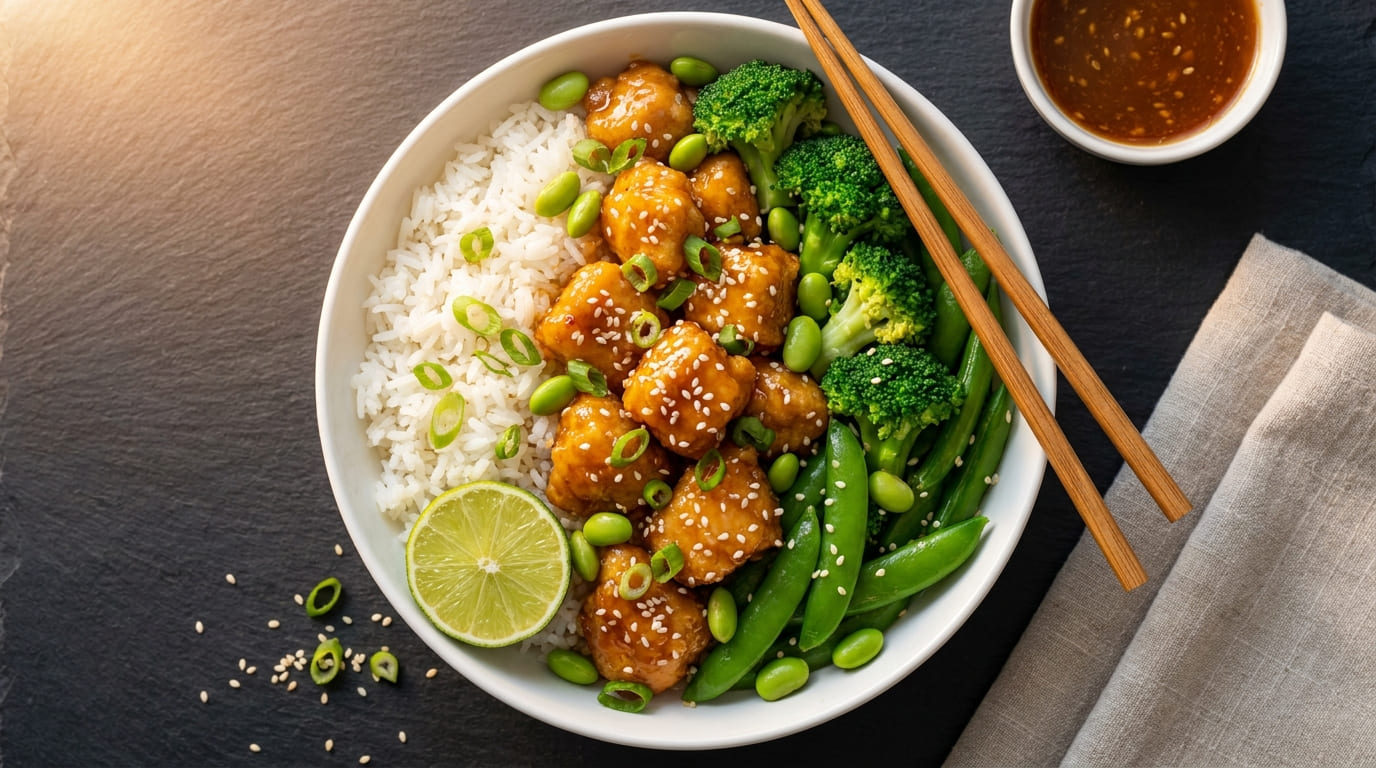
There is a particular category of recipe that has become the cornerstone of modern weeknight cooking: the meal prep bowl. A complete, macro-balanced, deeply flavorful meal that can be assembled in 30 minutes, divided into containers, and enjoyed with exactly the same quality over multiple days. This honey garlic chicken bowl is the highest-performing recipe in the meal prep collection on this site — and the reason is straightforward: the sauce.
Honey garlic is a flavor pairing that belongs in the same category as salt and butter, or tomato and basil. The natural, floral sweetness of honey and the pungent, aromatic heat of fresh garlic form a combination that is simultaneously familiar and complex. Add soy sauce for salt and umami, a touch of rice vinegar for brightness, and toasted sesame oil for nutty depth, and you have a sauce that makes everything it touches taste like it belongs in a restaurant. Poured over golden-seared 1-inch chicken bites and reduced in the pan to a sticky, glossy glaze, it produces the kind of dish that people photograph before eating.
If you’ve made the honey garlic shrimp bowls from this site, you already know the foundational version of this sauce. The chicken bowl variation uses the same core formula — honey, soy sauce, garlic, sesame oil — but adds rice vinegar for greater brightness and a cornstarch slurry for a more concentrated, glossy finish. Both belong to the same Asian-inspired weeknight recipe family that delivers takeout-quality flavor from a home kitchen in under 30 minutes.
The technique insight that separates this recipe from lesser versions of the same dish is the cornstarch coating. Before the chicken bites go into the hot pan, they’re tossed in a light coating of cornstarch mixed with salt and pepper. This creates a thin, barely-there crust on the outside of each piece that serves two functions: it produces a lightly golden exterior during searing (rather than the pale, grey result you get from uncoated chicken), and it gives the honey garlic sauce a surface to grip. Sauced chicken coated in cornstarch develops a lacquered, restaurant-quality glaze. Uncoated chicken in the same sauce tends to have sauce that slides off and pools at the bottom of the bowl rather than adhering to every piece.
“The rice bowl is the most honest format in modern cooking. Every component earns its place on a flat surface with nowhere to hide. The chicken has to be properly glazed. The rice has to be properly cooked. The vegetables have to have texture. When all three are right, the bowl is extraordinary.”
As a healthy bowl recipe, this one deserves specific attention for its macronutrient profile. At approximately 800 calories per serving, this is a substantial, high-protein complete meal — not a light side dish. The USDA protein data shows that a 150g cooked chicken breast provides over 46 grams of complete protein alone, and the addition of edamame in the vegetable component adds another 6 grams. Total protein per bowl exceeds 60 grams — a full day’s protein requirement for many adults in a single meal. For athletes, active adults, or anyone using this recipe as the centerpiece of their meal prep strategy, the macros are well-suited to performance and body composition goals.
The meal prep credentials of this recipe are equally strong. The chicken, sauce, rice, and vegetables each store separately in the refrigerator and maintain their quality for up to 4 days. The key is keeping the components separate until serving — rice mixed with sauced chicken absorbs moisture overnight and can go soggy. In separate airtight meal prep containers, each element reheats independently and comes together into a fresh-tasting bowl every single day of the week.
Chef’s Note: Cornstarch Coating + Dry Chicken = The Glaze Secret
Two steps that work together and are both non-negotiable for this recipe. First: pat the chicken pieces completely dry with paper towels before tossing in cornstarch. Any surface moisture on the chicken prevents the cornstarch from adhering properly and creates steam in the pan instead of a sear. Second: toss the dried chicken in the cornstarch mixture until every surface is lightly coated — shake off any excess. The cornstarch layer should be thin, not thick; it’s a coating, not a batter. When this coated chicken hits a properly hot skillet with oil AND butter (butter for flavor, oil to prevent the butter from burning), the result is a golden exterior that holds the honey garlic glaze as a lacquered, restaurant-quality finish. Skip either step — drying or coating — and the sauce slides off rather than adhering.
Recipe Notes
This honey garlic sauce is one of the most versatile on the site. You’ve seen it in a simpler form in the 5-ingredient honey garlic chicken dinner — the bowl version here adds rice vinegar, sesame oil, and the cornstarch slurry to make the sauce stickier, glossier, and better suited to a rice bowl format. Both recipes are worth knowing. The 5-ingredient version is faster for a single dinner; the bowl version is more refined and meal-prep optimized.
Rice alternatives: White jasmine rice is the classic base. Brown rice adds more fiber and a nuttier flavor — add an extra ¼ cup water per serving and increase simmer time to 35 minutes. Cauliflower rice cuts carbs significantly and works well if you’re going lower-carb. Quinoa provides additional protein and a firmer texture. All of these pair equally well with the honey garlic sauce — the sauce is the constant, the grain is flexible.
Vegetable substitutions: The broccoli, snap peas, and edamame combination is deliberately chosen for color contrast (green on green on green), protein contribution (edamame), and cook time compatibility. For variation: roasted red bell pepper strips add sweetness and color; shredded purple cabbage adds a textural element and visual contrast; thinly sliced cucumber served cold provides a refreshing counterpoint to the warm glazed chicken. The crispy air fryer broccoli from this site is an excellent upgrade to plain steamed broccoli — add it in the last assembly step instead of steamed florets.
For a more complete picture of rice bowl dinners on this site, the one pot chicken and rice is the creamy, Dutch-oven version of a chicken-and-rice combination — built for comfort and served from a single pot. These two recipes occupy complementary spaces: that one is the weeknight comfort dinner; this one is the meal prep performance bowl. Different occasions, different approaches, equally worthwhile.
“Meal prep doesn’t have to mean eating the same sad container of food for four days. When the components are stored separately and the sauce is genuinely good, Day 4 of this bowl tastes as good as Day 1. That’s the meal prep standard worth cooking to.”
Meal prep storage guide:
Store each component in separate airtight meal prep containers: glazed chicken (up to 4 days), cooked rice (up to 5 days), and blanched or steamed vegetables (up to 4 days). Assemble bowls immediately before eating — don’t pre-assemble as the sauce will soften the rice and the vegetables will lose texture. To reheat: microwave the chicken and rice together for 90 seconds, then add cold or lightly warmed vegetables on top. A drizzle of sesame oil and fresh green onion over the reheated bowl restores much of the freshly-made quality.
Make-ahead sauce: The honey garlic sauce (before the cornstarch slurry is added) keeps in a sealed jar in the refrigerator for up to 2 weeks. Double or triple the sauce batch and use it across multiple meals throughout the week — it works equally well on salmon, shrimp, tofu, and roasted vegetables.
For more 30-minute meals and meal prep-friendly dinners organized by time and ingredient count, browse the full Quick & Easy weeknight collection — built specifically for the reality of cooking on busy evenings.
Frequently Asked Questions
Why toss the chicken in cornstarch before cooking?
Cornstarch creates a thin, barely-there crust on the chicken surface during searing that does two important things: it produces a lightly golden exterior (rather than pale, steamed-looking chicken), and it gives the honey garlic sauce a texture to grip — the glaze adheres to the crust rather than sliding off. The cornstarch in the sauce slurry additionally thickens the sauce to a sticky, lacquered consistency. Both uses of cornstarch work together to produce restaurant-quality results.
Can I use chicken thighs instead of breasts?
Yes — boneless skinless thighs are excellent here and stay even juicier than breasts. They also have a richer flavor that pairs well with the sweet honey glaze. The sear time on each side increases slightly to 4–5 minutes, and the total sauce-glazing time increases to 3–4 minutes. Internal temperature check is the same: 74°C (165°F).
How do I prevent the honey from burning in the pan?
Reduce the heat to medium (not medium-high) before adding the sauce. Honey begins to burn at temperatures above 180°C — at medium heat, the pan temperature is low enough for the honey to caramelize without scorching. Stir continuously once the sauce goes in and don’t walk away. The cornstarch slurry thickens the sauce quickly and helps prevent it from reducing too far and burning in the pan.
Can I meal prep these bowls ahead of time?
Yes — this is specifically designed as a meal prep recipe. Store each component (chicken, rice, vegetables) in separate airtight containers for up to 4 days. Do not pre-assemble — the sauce will soften the rice and vegetables if stored together. Assemble each bowl when ready to eat and reheat the chicken and rice together for 90 seconds in the microwave before adding the cold or lightly warmed vegetables on top.
Is this recipe gluten-free?
The recipe as written contains soy sauce, which typically contains wheat. To make it gluten-free: substitute certified gluten-free tamari or coconut aminos (use slightly less coconut aminos as it’s sweeter than soy sauce). All other ingredients are naturally gluten-free. Check that your cornstarch is certified gluten-free if this is a serious dietary concern.
How do I get the sauce to be extra thick and sticky?
Two approaches: (1) Double the cornstarch slurry (½ tsp cornstarch in 1 tsp cold water per serving) for a thicker result. (2) Allow the sauce to reduce for an extra 1–2 minutes before returning the chicken or calling it done. The sauce thickens significantly as it cools — what looks slightly thin in the pan will set to a proper glaze on the chicken within 2 minutes of coming off the heat.